- All
- Product Name
- Product Keyword
- Product Model
- Product Summary
- Product Description
- Multi Field Search
Views: 222 Author: Katherine Publish Time: 12-02-2024 Origin: Site


Content Menu
● Understanding Under Cabinet LED Lighting
>> Measuring Your Cabinet Space
>> Choosing the Right LED Strips
>> Gathering Tools and Materials
● Step-by-Step Installation Process
>> Step 1: Prepare the Installation Area
>> Step 2: Plan Power Supply Location
>> Step 3: Install Power Supply
>> Step 4: Cut and Prepare LED Strips
>> Step 8: Test Your Installation
>> Step 9: Finalize Installation
● Enhancing Your Under Cabinet Lighting
>> Integrating Smart Home Features
● Maintenance Tips for Under Cabinet Lighting
>> 1. Can I install under cabinet lighting without hardwiring?
>> 2. What tools do I need for installing under cabinet lights?
>> 3. How do I choose between different types of LED strips?
>> 4. Is it safe to install under cabinet lighting myself?
>> 5. How do I troubleshoot if my under cabinet lights don't work?
Installing under cabinet LED lighting can significantly enhance the functionality and aesthetics of your kitchen or workspace. Hardwiring these lights provides a clean and professional look, eliminating the need for visible cords and plugs. This comprehensive guide will walk you through the entire process, from planning to installation, ensuring you achieve optimal results. By following these steps, you will not only improve the lighting in your space but also increase its value and appeal.
What is Under Cabinet Lighting?
Under cabinet lighting refers to fixtures installed beneath kitchen cabinets or shelves, illuminating countertops and workspaces. These lights can take various forms, including LED strips, puck lights, or linear fixtures. LED lights are favored for their energy efficiency, longevity, and variety of styles. They provide bright, focused illumination that enhances visibility while cooking or performing tasks on the countertop. Additionally, under cabinet lighting can create a warm ambiance in the kitchen, making it a more inviting space for family gatherings or entertaining guests.
Benefits of Hardwiring Under Cabinet Lights
Hardwiring under cabinet LED lighting offers several advantages that go beyond aesthetics:
- Clean Appearance: Eliminates visible cords and plugs, contributing to a streamlined look in your kitchen. This is particularly important in modern designs where minimalism is key.
- Enhanced Functionality: Provides better task lighting for cooking and other activities, reducing shadows and improving visibility for intricate tasks like chopping vegetables or reading recipes.
- Energy Efficiency: LED lights consume significantly less power compared to traditional incandescent or fluorescent bulbs, resulting in lower energy bills over time. They also have a longer lifespan, which reduces the frequency of replacements.
- Customization: Allows for integration with home automation systems. You can program your lights to turn on at specific times or adjust their brightness according to the time of day or activity.
Before diving into the installation process, thorough planning is essential. This phase includes measuring your space, selecting the right LED strips, and gathering necessary tools. Taking the time to plan will ensure that your installation goes smoothly and meets your expectations.
Accurate measurements are crucial for determining how much LED strip lighting you will need. Measure the length of each cabinet section where you plan to install the lights. It is advisable to add a few extra inches to your measurements to accommodate any adjustments. Consider any obstacles such as appliances or decorative elements that might affect placement. Additionally, think about how far back from the edge of the cabinet you want to position the lights; this will influence how much light spills onto your countertop.
When selecting LED strips for under cabinet lighting, consider several factors:
- Brightness Level: Measured in lumens; choose according to your needs. For task-oriented spaces like kitchens, higher lumens are preferable.
- Color Temperature: Ranges from warm white (2700K) to cool white (5000K); select based on your kitchen's ambiance. Warmer tones create a cozy atmosphere, while cooler tones provide a more modern and energetic feel.
- Voltage Options: Commonly 12V or 24V; ensure compatibility with your power supply. Higher voltage systems may allow for longer runs without voltage drop but may require more careful installation.
Prepare the following tools and materials before starting:
- Drill: Necessary for creating holes for mounting brackets and running wires.
- Wire Stripper: Essential for preparing electrical wires for connections.
- Screwdriver: Needed for securing fixtures and electrical boxes.
- Drywall Saw: Useful if you need to cut into drywall for wiring.
- Voltage Tester: Ensures that power is off before you start working on any electrical components.
- LED Strip Lights: The main component of your installation; choose high-quality strips for best results.
- Power Supply: Converts household voltage to a level suitable for your LED strips.
- Mounting Clips or Brackets: Help secure the strips in place under cabinets.
- Solderless Connectors (if needed): Facilitate easy connections between wires without soldering.
- Electrical Tape: Used for securing connections and ensuring safety.
Safety should always be your top priority when working with electrical systems. Follow these precautions:
- Turn off the power at the circuit breaker before starting any work. This is crucial to prevent electrical shocks or accidents during installation.
- Use a voltage tester to confirm that the electricity is off. Double-checking this step can save you from potential hazards.
- Wear safety glasses when drilling or cutting materials to protect your eyes from debris.
- Follow manufacturer instructions for all components to ensure proper usage and safety compliance.

Begin by cleaning the undersides of your cabinets thoroughly. Remove any dust or grease using a degreasing cleaner, then wipe down with rubbing alcohol. This ensures good adhesion for the LED strips. A clean surface will help prevent peeling over time and ensure that the lights stay securely in place.
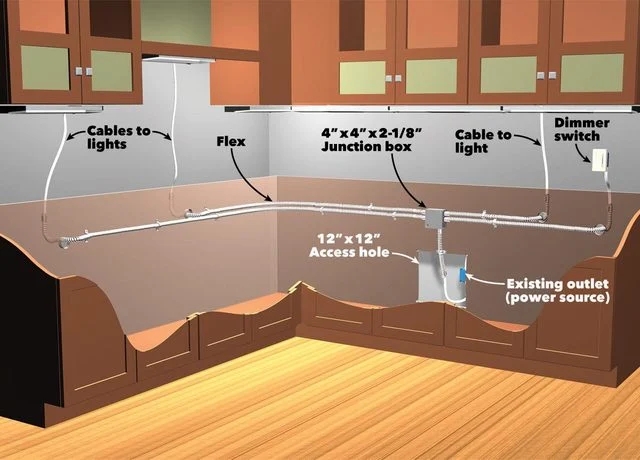
Identify where you will draw power for your under cabinet lights. This could be from an existing outlet or by installing a new one. If adding an outlet, locate it in an accessible area but hidden from view. Ensure that it complies with local electrical codes regarding placement near water sources such as sinks.
If you're hardwiring, install a remodeling box above an upper cabinet. Cut a hole in the drywall as needed and feed electrical wires through. Connect these wires to your power supply according to local electrical codes. Ensure that all connections are secure and insulated properly to prevent short circuits.
Measure and cut your LED strips to fit the designated areas under the cabinets. Ensure that you cut along designated lines on the strip to avoid damaging them. After cutting, prepare any connectors needed for joining multiple strips together if necessary.
Peel off the adhesive backing from the LED strips and carefully attach them under each cabinet. Start at one end and press firmly as you move along, ensuring there are no air bubbles. For added security, consider using mounting clips alongside adhesive backing.
For hardwired installations, connect the LED strip wires to your power supply. Make sure to align polarity correctly (positive to positive, negative to negative). Use solderless connectors or twist-on wire connectors as needed; this ensures a reliable connection without soldering complications.
Use clips or adhesive tape to secure any visible wiring along the underside of cabinets. This keeps everything tidy and prevents damage during regular kitchen activities like cleaning or cooking.
Before finalizing everything, turn on the power at the circuit breaker and test your lights. Ensure all connections are working properly; check each section of lighting individually if possible.
Once testing is complete, secure any loose wires with electrical tape and install any necessary covers over exposed wiring or connections. This not only protects against accidental contact but also enhances safety by minimizing fire hazards.
After successfully installing your hardwired under cabinet LED lighting, consider additional enhancements:
Incorporating dimmer switches allows you to adjust brightness levels based on your needs or mood. Dimming capabilities can create different atmospheres depending on whether you're preparing a meal or hosting a dinner party.
You can connect your under cabinet lights to smart home systems for added convenience. This allows you to control lighting through voice commands or mobile apps, enabling features like scheduling lights based on daily routines.
Installing motion sensors can automate your lighting, turning them on when you enter a room and off when you leave. This not only adds convenience but also saves energy by ensuring lights are only on when needed.
To keep your under cabinet lighting functioning optimally:
- Regularly check connections for wear or damage; this helps prevent unexpected outages.
- Clean LED strips gently with a damp cloth to remove dust; avoid harsh chemicals that could damage components.
- Replace any faulty components promptly; this ensures consistent performance and prevents further issues down the line.
Hardwiring under cabinet LED lighting enhances both functionality and aesthetics in your kitchen or workspace. By following this guide meticulously, you can achieve a professional-looking installation that meets your specific needs while enjoying the benefits of energy-efficient lighting. The result will be an inviting space that not only serves practical purposes but also elevates your home's overall design.
Yes, you can use plug-in options or battery-operated lights if hardwiring is not feasible; these alternatives offer flexibility but may require more frequent battery changes.
Essential tools include a drill, wire stripper, screwdriver, voltage tester, drywall saw, as well as materials like mounting clips and electrical tape.
Consider brightness levels (lumens), color temperature (K), voltage (12V vs. 24V), as well as features like waterproofing if they will be near sinks or moisture-prone areas.
If you're comfortable working with electrical systems and follow safety precautions diligently, it can be safe; otherwise, consider hiring a professional electrician who can ensure compliance with local codes.
Check all connections for proper alignment; verify that power is supplied correctly; inspect fuses in your circuit breaker; also ensure no damage has occurred during installation that could affect functionality.


